
Visualize your install with step-by-step diagrams showing the sequential layers and installation process of various ProREZ systems. These include visuals of base coats, broadcast layers, grout coats, and topcoats, along with options like cove base or vertical surfaces.
Ideal for training, estimating, or specification, these diagrams visually communicate how a finished system comes together layer by layer.
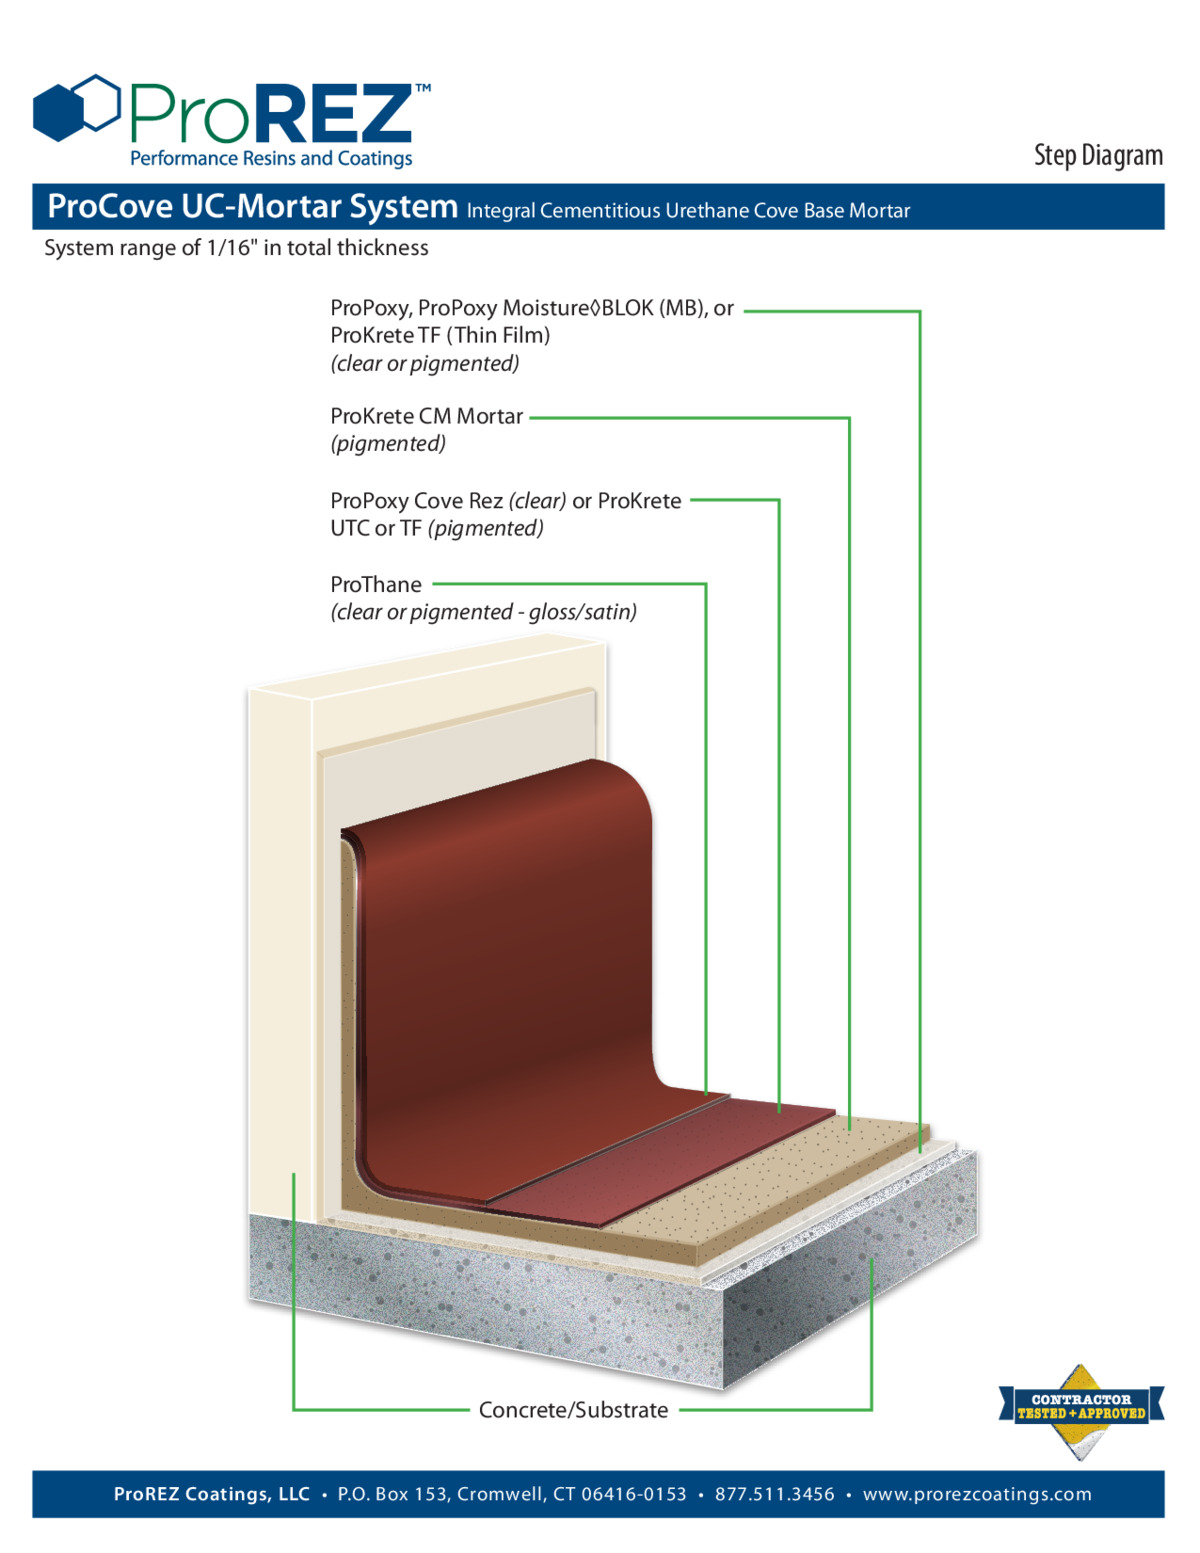
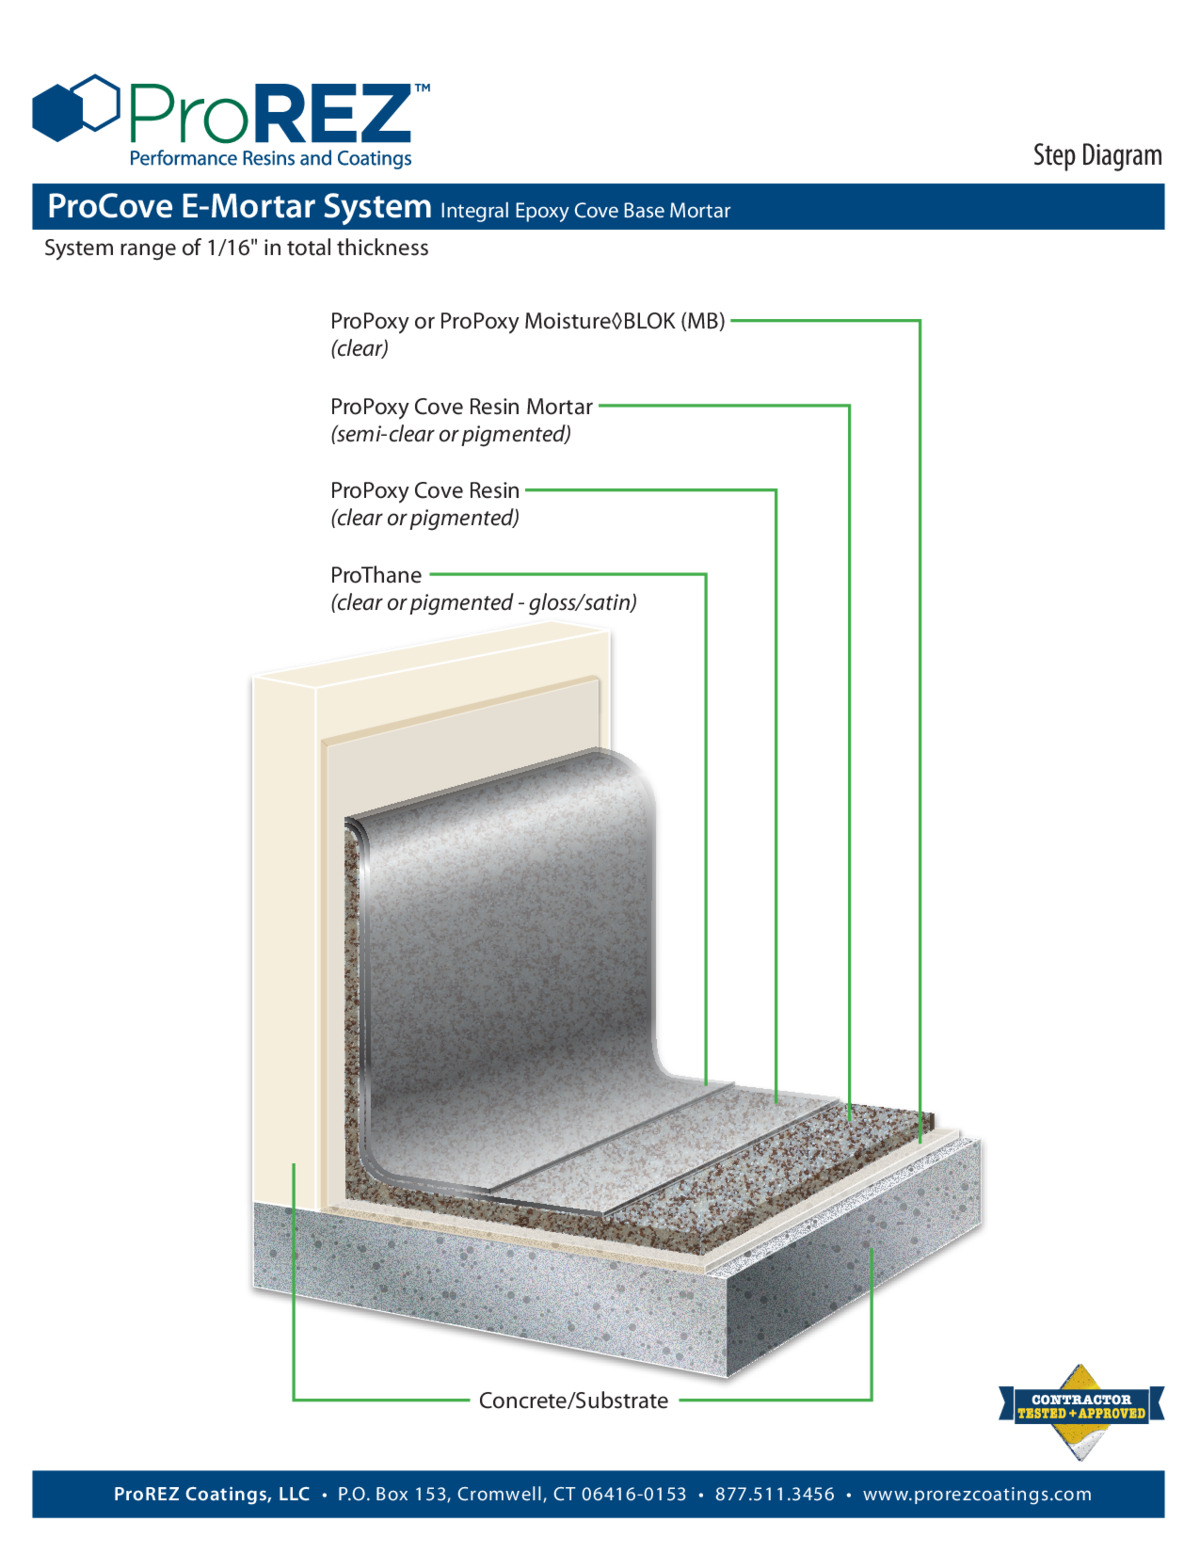
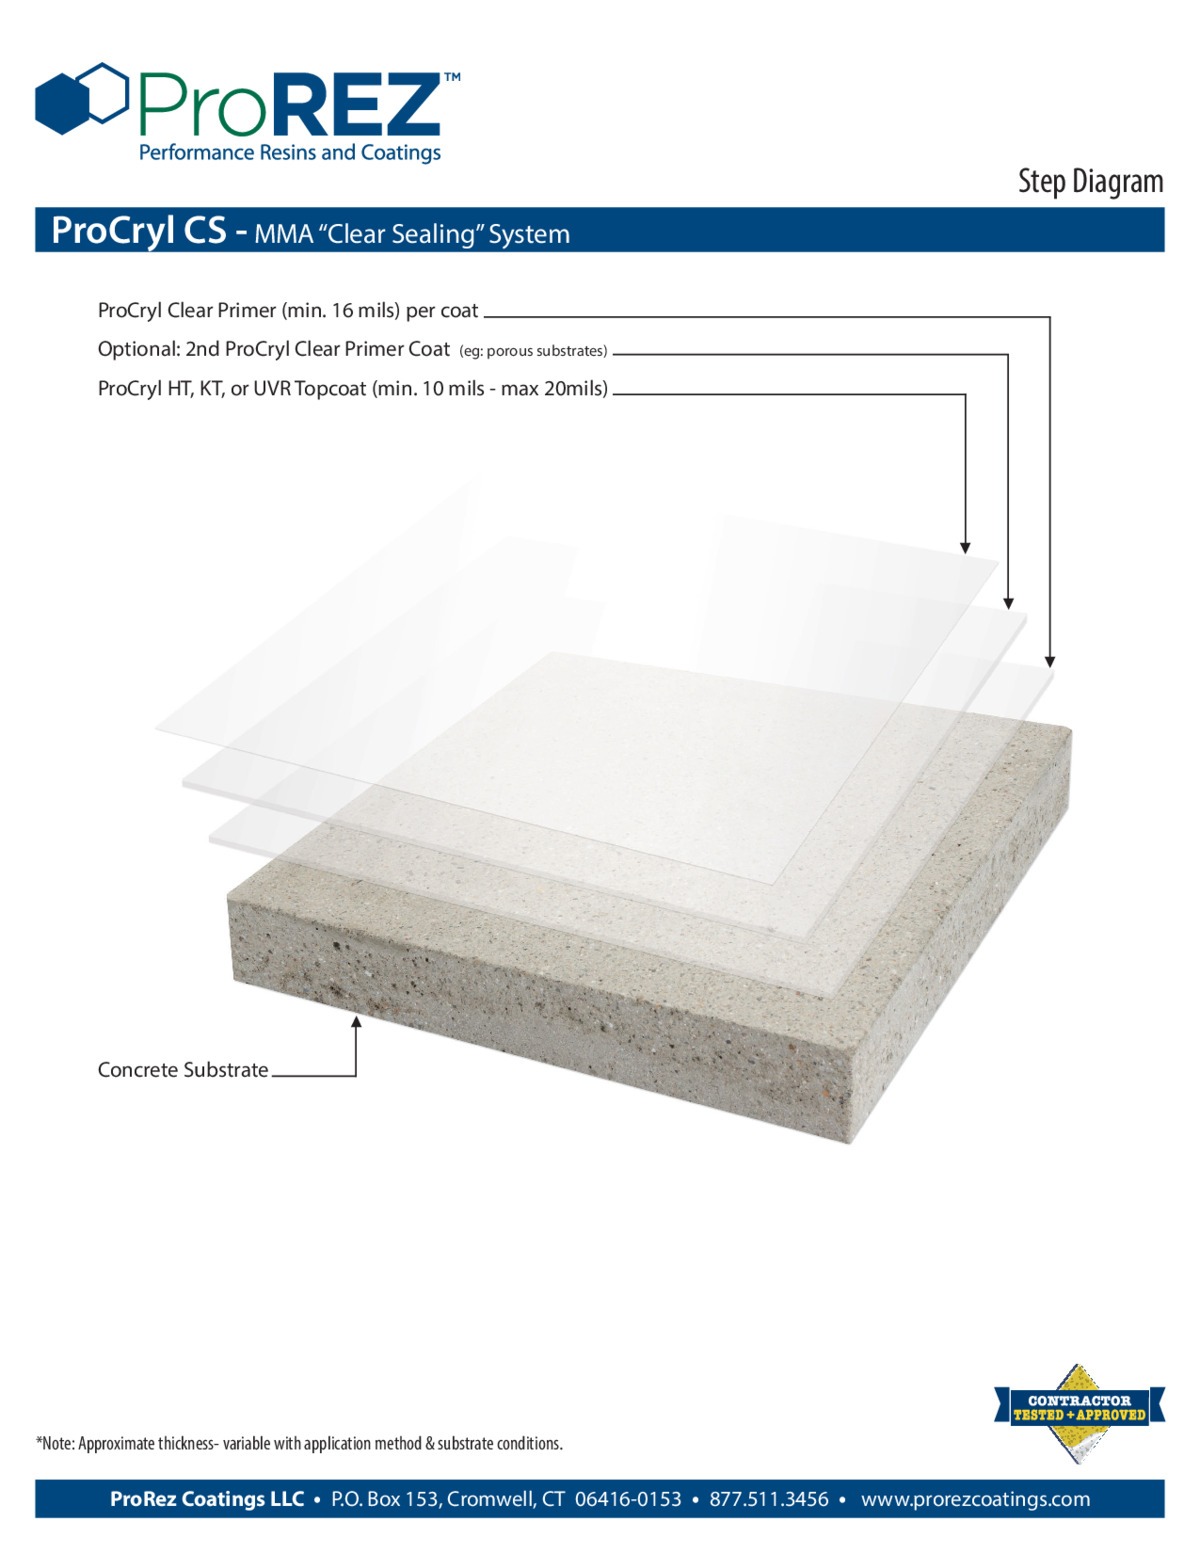
Cementitious Urethane
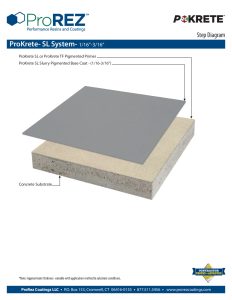
ProKrete‑SL SLB Step Diagram
This PDF provides a step‑by‑step visual guide for installing the ProKrete‑SL SLB system. It begins with surface preparation—shot blasting or diamond grinding to attain an ICRI CSP 3–5 profile and moisture testing. The diagrams then show mixing of the self‑leveling or self‑leveling semi‑lightweight mortar, pumping or pouring it onto the floor, and using a screed bar or gauge rake to achieve the desired 1/8″–3/4″ thickness. Next, it illustrates optional broadcast of lightweight aggregate for flowable/mortar applications, followed by trowel finishing to smooth the surface. Each illustration highlights pot life constraints, cure times (light traffic in 2 hours), and equipment recommendations so installers can complete a consistent, rapid‑curing system.
View PDF
ProKrete-HD-RT-RTB Step Diagram
This PDF provides a step‑by‑step visual guide for installing the ProKrete‑HDRT RTB system. It outlines critical steps including surface profiling (shot blasting to achieve a CSP 3–5 profile) and moisture vapor testing. The diagrams then show mixing and placement of the high‑density, rapid‑turnaround cementitious mortar, followed by power troweling to achieve a 1/8″–1/4″ thickness. Next, it illustrates optional broadcast of sand for added mechanical bond and the final sealing step with a compatible topcoat. Each illustration clarifies pot life, cure times, and tool orientation so installers can quickly follow the correct sequence and achieve a high‑strength, fast‑curing floor.
View PDF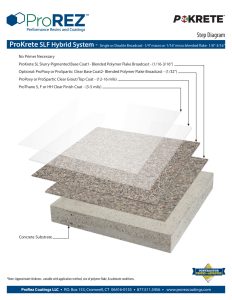
ProKrete‑SLF SLQ Step Diagram
This PDF provides a step‑by‑step visual guide for installing the ProKrete‑SLF SLQ system. It starts with surface prep—shot blasting or diamond grinding to CSP 3–5 and verifying moisture conditions. The diagrams show mixing of the urethane prepolymer with engineered cementitious fillers to create a self‑leveling or lightweight flowable screed, followed by pumping and screeding to achieve the specified thickness. Next, it illustrates optional sand broadcast for non‑slip or decorative finishes, then trowel finishing for a smooth top surface. Each illustration calls out pot life (3–5 minutes), cure schedules (light traffic in 2 hours), and tool setup so contractors can perform a reliable, rapid‑cure installation.
View PDF
ProCove UC Mortar Step Diagram
View PDFDecorative Coatings

ProLumina Step Diagram
This PDF provides a step‑by‑step visual guide for installing the ProLumina metallic epoxy system. It begins with substrate prep—diamond grinding to an ICRI CSP 3–5 profile and moisture testing. The diagrams then show mixing the epoxy resin with proprietary metallic pigment blends, pouring and spreading via squeegee or roller to create a uniform base coat, and adding broadcast of metallic flakes if required. Next, it illustrates backrolling techniques to achieve the three‑dimensional “depth” effect, followed by application of a UV‑stable topcoat for protection and gloss. Each illustration calls out cure times (tack free in 6 hours) and ambient conditions so that installers can replicate the desired decorative, high‑definition finish.
View PDF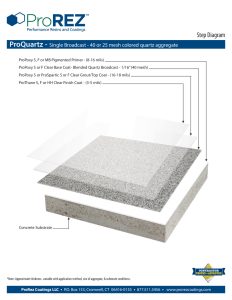
ProQuartz Step Diagram
This PDF provides a step‑by‑step visual guide for installing the ProQuartz broadcast epoxy system. It covers substrate surface prep—diamond grinding to an ICRI CSP 3–5 profile and moisture evaluation—followed by mixing the epoxy binder and broadcasting colored quartz chips at specified rates. The diagrams then illustrate backrolling to embed the quartz, followed by application of a clear epoxy topcoat to lock in the decorative finish. Each illustration clarifies pot life, trowel angles, and target mil thickness (10–15 mils) so installers can achieve a uniform, slip‑resistant floor. Designed for quick reference, the sequential visuals streamline proper ProQuartz system installation for contractors.
View PDF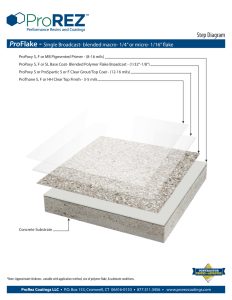
ProFlake Step Diagram
This PDF provides a step‑by‑step visual guide for installing the ProFlake system. It covers essential stages such as surface preparation (concrete profiling, moisture testing), primer application, broadcast of vinyl flake or quartz, and the final topcoat sealing. Each diagram shows recommended tool setup, trowel angles, and target thickness guidelines for each layer. These illustrations help installers maintain consistent coverage, ensure proper adhesion, and achieve the intended decorative, slip‑resistant finish. Designed as a quick reference, the sequential visuals streamline the ProFlake installation process for contractors.
View PDF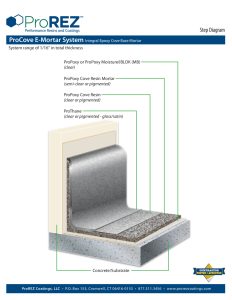
ProCoveEpoxy_StepDiagram
View PDF
DecoStone LX System Step Diagram
View PDFGrind and Seal
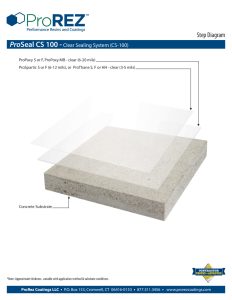
ProSeal‑CS Step Diagram
This PDF provides a step‑by‑step visual guide for installing the ProSeal CS sealer additive system. It begins with substrate preparation—diamond grinding to ICRI CSP 3–5 and ensuring the surface is clean and dry. The diagrams then show mixing instructions for ProSeal CS additive with a compatible epoxy or polyurethane binder, followed by roller or squeegee application to achieve the targeted 1–2 mils dry film thickness. Next, it illustrates ambient and substrate temperature considerations, cure times (tack free in 2 hours, full cure in 24 hours), and safety precautions. Designed to help installers add enhanced abrasion and chemical resistance to existing coatings, these illustrations ensure the correct sequence for a durable, sealed finish.
View PDFIndustrial Coatings
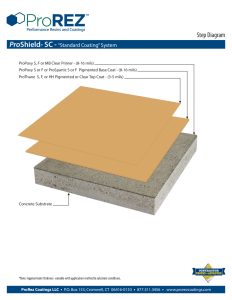
ProSeal‑CS Step Diagram
This PDF provides a step‑by‑step visual guide for installing the ProSeal CS sealer additive system. It begins with substrate preparation—diamond grinding to ICRI CSP 3–5 and ensuring the surface is clean and dry. The diagrams then show mixing instructions for ProSeal CS additive with a compatible epoxy or polyurethane binder, followed by roller or squeegee application to achieve the targeted 1–2 mils dry film thickness. Next, it illustrates ambient and substrate temperature considerations, cure times (tack free in 2 hours, full cure in 24 hours), and safety precautions. Designed to help installers add enhanced abrasion and chemical resistance to existing coatings, these illustrations ensure the correct sequence for a durable, sealed finish.
View PDF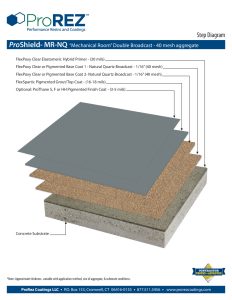
ProShield‑MR Step Diagram
This PDF provides a step‑by‑step visual guide for installing the ProShield MR multi‑resin epoxy system. It starts with surface preparation—shot blasting or diamond grinding to achieve an ICRI CSP 3–5 profile and verifying moisture levels. The diagrams then show mixing procedures for resin coats (primer, base coat, top coat) and optional sand broadcast for enhanced mechanical bond. Next, it illustrates application techniques—squeegee or roller—and film thickness targets (12–15 mils) for each coat. Cure schedules (light traffic in 16 hours, full cure in 7 days), safety gear reminders, and ambient conditions are included so contractors can achieve a high‑performance, chemically resistant floor with ProShield MR.
View PDF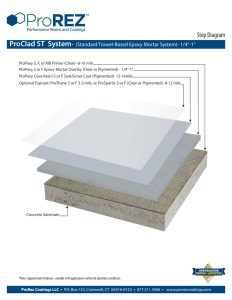
ProClad ST Step Diagram
This PDF presents a step-by-step visual guide for installing the ProClad ST System, a standard trowel-based epoxy mortar system with an approximate finished thickness of 1/4″ to 1″. The sequence begins with application of ProPoxy S, F, or MB Primer (Clear), applied at 8–16 mils. Next is the ProPoxy S or F Epoxy Mortar Overlay (Clear or Pigmented), applied at 1/4″ to 1″. A pigmented ProPoxy Cove Resin S or F serves as the seal/grout coat (12–16 mils). The diagram concludes with an optional topcoat: ProThane S or F (3–5 mils) or ProSpartic S or F (Clear or Pigmented, 8–12 mils). Thicknesses are approximate and may vary depending on application method and substrate conditions.
View PDF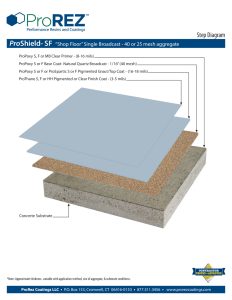
ProShield SF Step Diagram
This PDF provides a step‑by‑step visual guide for installing the ProShield SF solvent‑free epoxy flake system. It begins with substrate prep—shot blasting or diamond grinding to ICRI CSP 3–5 profile and verifying moisture. The diagrams then show mixing the epoxy binder, broadcasting decorative flake, and backrolling to achieve a dense, slip‑resistant surface. Next, it illustrates applying a clear topcoat to seal the flake and deliver a UV‑stable finish. Each illustration notes pot life (30–45 minutes), cure times (tack free in 6 hours, full cure in 48 hours), and ambient conditions so installers can produce a durable, decorative epoxy flake floor.
View PDF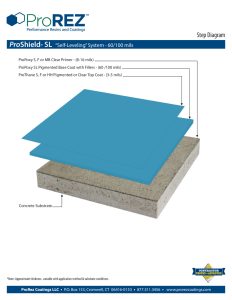
ProShield SL Step Diagram
This PDF provides a step‑by‑step visual guide for installing the ProShield SL solvent‑free epoxy system. It begins with substrate prep—shot blasting or diamond grinding to ICRI CSP 3–5 profile and moisture testing. The diagrams then show mixing for each coat (epoxy primer, epoxy base coat, epoxy top coat) and optional sand broadcast for slip resistance. Next, it illustrates trowel or roller application at 15–20 mils per coat and highlights cure times (tack free in 4 hours, light traffic in 16 hours). Detailed callouts include ambient/ substrate temperature ranges and personal protective equipment so installers can achieve a uniform, high‑strength, chemical‑resistant finish.
View PDFMethyl Methacrylate
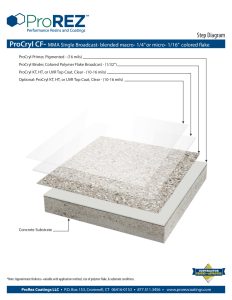
ProCryl CS Step Diagram
This PDF provides a step‑by‑step visual guide for installing the ProCryl CS colored quartz MMA system. It begins with substrate prep—diamond grinding or shot blasting to ICRI CSP 3–5 profile and moisture testing. The diagrams then show mixing binder and initiator, broadcasting colored quartz chips, and backrolling to embed the chips. Next, it illustrates applying a UV‑stable topcoat to seal the quartz and achieve a decorative, slip‑resistant finish. Each illustration includes pot life (10–15 minutes), cure times (light traffic in 1 hour, full service in 2 hours), and recommended temperature/humidity ranges so installers can replicate the system reliably.
View PDF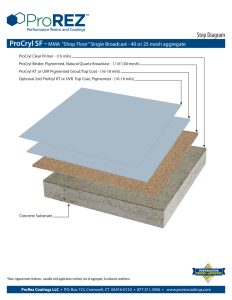
ProCryl SF Step Diagram
This PDF provides a step‑by‑step visual guide for installing the ProCryl SF vinyl flake MMA system. It begins with substrate prep—diamond grinding or shot blasting to ICRI CSP 3–5 profile and moisture evaluation. The diagrams then show mixing binder and initiator, broadcasting decorative vinyl flake, and backrolling to embed the flake. Next, it illustrates applying a UV‑stable topcoat for protection and gloss. Each illustration highlights pot life (10–15 minutes), cure times (light traffic in 30 minutes, full service in 2 hours), and recommended substrate/ambient conditions so installers can achieve a seamless, decorative, slip‑resistant floor.
View PDF
ProShield MR Step Diagram
This PDF provides a step‑by‑step visual guide for installing the ProShield MR multi‑resin epoxy system. It starts with substrate prep—shot blasting or diamond grinding to ICRI CSP 3–5 profile and moisture checks. The diagrams then show mixing of resin coats (primer, base coat, top coat) and optional sand broadcast for mechanical bond. Next, it illustrates application techniques—squeegee or roller—achieving target thickness (12–15 mils) for each coat. Cure schedules (light traffic in 16 hours, full cure in 7 days) and safety gear reminders are included so installers can achieve a high‑performance, chemically resistant floor.
View PDF
ProCryl CQ Step Diagram
This PDF provides a step‑by‑step visual guide for installing the ProCryl CQ colored quartz MMA system. It begins with surface prep—shot blasting or diamond grinding to an ICRI CSP 3–5 profile and checking moisture levels. The diagrams then show mixing ratios for binder and initiator, broadcasting colored quartz chips, and backrolling to embed the quartz. Next, it illustrates application of a UV‑stable topcoat for decorative finish and protection. Detailed callouts include pot life (10–15 minutes), cure times (light traffic in 1 hour), and recommended substrate and ambient temperature ranges so installers can achieve a uniform, decorative quartz floor.
View PDF
ProCryl CS Step Diagram
This PDF provides a step‑by‑step visual guide for installing the ProCryl CS colored quartz MMA system. It begins with substrate prep—diamond grinding or shot blasting to ICRI CSP 3–5 profile and moisture testing. The diagrams then show mixing binder and initiator, broadcasting colored quartz chips, and backrolling to embed the chips. Next, it illustrates applying a UV‑stable topcoat to seal the quartz and achieve a decorative, slip‑resistant finish. Each illustration includes pot life (10–15 minutes), cure times (light traffic in 1 hour, full service in 2 hours), and recommended temperature/humidity ranges so installers can replicate the system reliably.
View PDF